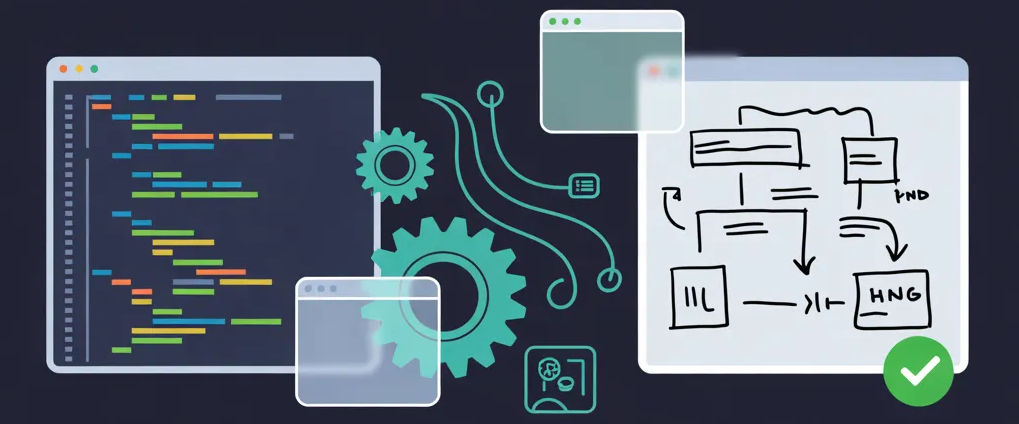
Generate Excalidraw Diagrams from Claude Code with MCP
When you use Claude Code daily, there comes a point where words are no longer enough. You describe a CI/CD pipeline, a microservices architecture, a Kubernetes cluster… and you inevitably end up opening Excalidraw in another tab to draw what you just explained. I wanted to skip that step entirely: have Claude Code generate the diagrams itself, right from the terminal.
That’s exactly what the excalidraw-render MCP server does.
What we’re setting up
We’re going to connect Claude Code to an MCP server that launches a headless Chromium browser in the background. When you ask for a diagram, Claude Code builds a JSON of Excalidraw elements, sends it to the server, and the server produces a PNG or SVG file on disk.
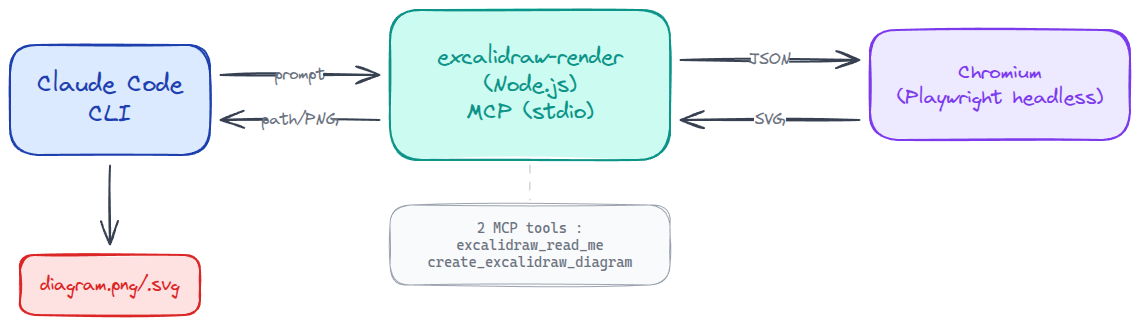
The analogy is simple: excalidraw-render acts as a “headless printer.” Claude Code sends it a JSON description of shapes, and the server uses the real @excalidraw/excalidraw library to produce a faithful rendering. Everything stays local — no data leaves your machine.
Which MCP server to choose?
Before jumping into installation, here’s a quick overview of the available options as of February 2026:
| Server | Approach | Use case | Output |
|---|---|---|---|
| excalidraw-render (bassimeledath) | Headless Chromium, PNG/SVG export | Claude Code CLI — one-shot generation | File on disk |
| excalidraw-mcp-app (official) | MCP Apps (ui:// resources) | Claude Desktop, ChatGPT — inline rendering | Widget in chat |
| mcp_excalidraw (yctimlin) | Live canvas + WebSocket + 26 tools | Iterative CRUD, real-time collaboration | Live web canvas |
| @cmd8/excalidraw-mcp | Local .excalidraw file | Editing existing files | .excalidraw file |
For a Claude Code CLI setup, excalidraw-render is the best fit: lightweight, no canvas server to maintain, direct file output.
What do you need to generate Excalidraw diagrams?
- Node.js >= 18 (check with
node -v) - Claude Code CLI installed and working
- Chromium is installed automatically by Playwright on first launch
How to install the Excalidraw MCP server?
Option 1 — npx (recommended)
A single command is all it takes:
claude mcp add --scope user --transport stdio excalidraw -- npx -y excalidraw-renderThe --scope user flag makes the server available across all your Claude Code projects. No local dependency to manage, the version stays up to date automatically.
Option 2 — Local installation
If you’d rather pin a specific version:
git clone https://github.com/bassimeledath/excalidraw-render.git
cd excalidraw-render
npm install
npm run build

# Register in Claude Code
claude mcp add --scope user --transport stdio excalidraw -- \
  node /absolute/path/to/excalidraw-render/dist/index.js
Verification
claude mcp list

# Expected output:
# excalidraw: npx -y excalidraw-render (scope: user, transport: stdio)
The MCP tools exposed
The server exposes two tools that Claude Code calls automatically:
| Tool | Purpose | When it’s called |
|---|---|---|
excalidraw_read_me | Returns the Excalidraw element format cheat sheet | Automatically, before the first diagram |
create_excalidraw_diagram | Takes a JSON of elements + options, produces a PNG or SVG | On every diagram request |
Parameters for create_excalidraw_diagram
{
  "elements": [],
  "format": "png",
  "output_path": "/tmp/my-diagram.png"
}
The format accepts "png" or "svg". The output path can be any writable directory.
The rendering cycle
Here’s what happens under the hood on each request:
- A headless Chromium browser is launched as a singleton (first call ~3s)
- The browser loads
@excalidraw/excalidrawfrom theesm.shCDN - The JSON elements are converted via
convertToExcalidrawElements() - SVG export via
exportToSvg() - For PNG: Playwright takes a screenshot of the SVG element
- The file is written to disk, and the path is returned to Claude Code
- Subsequent calls reuse the already-running browser (~60ms per render)
The first call is a bit slow, but everything after that is near-instant.
How to use Excalidraw from Claude Code?
Your first diagram
Just describe what you want in natural language:
Draw an architecture diagram showing a load balancer
in front of 3 application servers connected to a PostgreSQL database
Claude Code will automatically:
- Call
excalidraw_read_meto load the element format - Build the JSON (rectangles, arrows, text, positions)
- Call
create_excalidraw_diagramwith the JSON - Return the path to the generated file
No extra configuration, no JSON to write yourself — you describe, Claude draws.
Effective prompt examples
The more specific your prompt is about components and their relationships, the better the result:
# Microservices architecture
Create an Excalidraw diagram showing a microservices architecture
with: API Gateway, Auth Service, Users Service, Orders Service,
a RabbitMQ queue between Orders and a Worker, and a PostgreSQL
database per service.

# CI/CD Pipeline
Diagram of my GitLab CI/CD pipeline:
commit → Docker build → unit tests → Trivy scan →
deploy staging → e2e tests → deploy prod (with Argo CD)

# Kubernetes infra
Diagram of my K8s cluster:
3 nodes, an NGINX Ingress, 2 namespaces (staging/prod),
each with application pods and a ClusterIP service
Retrieving and using the file
Claude Code displays the generated file path in its response. From there:
# Open directly
xdg-open /tmp/architecture.png
# Copy to your project
cp /tmp/architecture.png ./docs/diagrams/
# Or embed in a README
# Integration with a local Excalidraw instance
If you self-host your own Excalidraw instance (on a homelab, for example), two approaches let you combine automatic generation with manual editing.
Approach 1 — JSON round-trip
Ask Claude Code to generate the raw JSON instead of PNG:
Generate the Excalidraw JSON (not PNG) for a diagram of...Then import the JSON into your instance via the Open menu. From there you can adjust positions, add annotations, tweak the style — everything Excalidraw does best.
Approach 2 — Live canvas with mcp_excalidraw
For a bidirectional workflow between Claude Code and a live canvas, add the mcp_excalidraw server by yctimlin alongside:
# Launch the canvas
docker run -d -p 3000:3000 --name excalidraw-canvas \
  ghcr.io/yctimlin/mcp_excalidraw-canvas:latest

# Add the second MCP server
claude mcp add --scope user --transport stdio excalidraw-live -- \
  docker run -i --rm \
  -e EXPRESS_SERVER_URL=http://host.docker.internal:3000 \
  -e ENABLE_CANVAS_SYNC=true \
  ghcr.io/yctimlin/mcp_excalidraw:latest
You’ll then have two complementary MCP servers:
- excalidraw → fast PNG/SVG generation (one-shot)
- excalidraw-live → CRUD operations on a live canvas (iterative)
Troubleshooting
| Issue | Likely cause | Fix |
|---|---|---|
| First render very slow (>10s) | Chromium + CDN download | Normal on first call, ~60ms after |
| ”browser not found” error | Playwright without Chromium | npx playwright install chromium |
| Mispositioned elements | Incorrect x/y coordinates | Ask Claude to recalculate the layout |
| Truncated text in shapes | Width too small for the text | Increase element width |
| MCP server not detected | Wrong scope or transport | Check with claude mcp list |
| File not generated | Output path not writable | Check target directory permissions |
To diagnose issues:
# Test the MCP server manually
npx -y excalidraw-render

# Inspect exposed tools with the MCP inspector
npx @modelcontextprotocol/inspector -- npx -y excalidraw-render
Conclusion
With a single command, you connect Claude Code to an Excalidraw rendering engine. No more switching between the terminal and a drawing tool: you describe, Claude draws. The first render takes a few seconds (while Chromium spins up), subsequent ones are near-instant.
It’s a great example of what the MCP protocol enables: extending AI capabilities without sacrificing simplicity. And if the result isn’t quite right, you can always grab the JSON and refine it in your Excalidraw instance.
Useful links: